How to Sew a Handy Pencil Case with a Pocket and Handle

Looking for a practical and cute pencil case to sew at home?

This step-by-step tutorial will guide you through making one with a front pocket, a sturdy side handle, and a smooth zipper closure.

It's perfect for makes a lovely gift!

The finished measurements of this pouch are approximately
21.5㎝(8½″) W × 7㎝(2¾″) H × 7.5㎝(3″) D.
You may watch the full video tutorial on my Youtube channel.
Share this video with a lot of people who need it.
Let's get started!!
◆ Main Panel
② 24㎝ × 9㎝ (9½″ × 3⅝″) Outer layer
② 24㎝ × 9㎝ (9½″ × 3⅝″) Lining
② 21.5㎝ × 7㎝ (8½″ × 2¾″) Fusible fleece
◆ Front pocket
① 24㎝ × 8.5㎝ (9½″ × 3⅜″) Outer layer
① 24㎝ × 8.5㎝ (9½″ × 3⅜″) Lining
① 21.5㎝ × 6.25㎝ (8½″ × 2½″) Mid-weight woven fusible interfacing
◆ Bottom panel
① 23.5㎝ × 8㎝ (9¼″ × 3¼″) Outer layer
① 23.5㎝ × 8㎝ (9¼″ × 3¼″) Lining
① 21.5㎝ × 6㎝ (8½″ × 2⅜″) Fusible fleece
◆ Zipper panel
② 27.5㎝ × 5㎝ (10⅞″ × 2″) Outer layer
② 27.5㎝ × 5㎝ (10⅞″ × 2″) Lining
② 25.5㎝ × 3㎝ (10⅛″ × 1¼″) Fusible fleece
◆ Side panel
① 9㎝ × 9.5㎝ (3⅝″ × 3¾″) Outer layer
① 9㎝ × 9.5㎝ (3⅝″ × 3¾″) Lining
① 7㎝ × 7.5㎝ (2¾″ × 3″) Fusible fleece
◆ Others
① 27.5cm (10⅞″) Zipper
① 1.5㎝ (5/8″) Wide Webbing Strap 12.5㎝ (5″)
① 4㎝ (1⅝″) Wide bias tape 140㎝ (55⅜″)


Cut the interfacing into the shape of the pattern.
Fuse the fusible fleece, centered, to the wrong side.

Place the right sides together of the outer and lining of the front pocket and sew the top with an allowance of about 1㎝(3/8″).
Open out, press pieces away from and top stitch on 3㎜ (1/8″) away from the top.
Place the front pocket on the right side of the main panel and sew.
Sew the bottom panel to the bottom of the main panel.

Place the wrong sides together of the outer and lining and sew all the way around.

Place the webbing strap on the right side of the side panel and sew.

With assembled lining right side up, center zipper right side facing up along top edge.
Place the outer layer, right side down on top. Pin in place.
Using your zipper foot, sew along top edge using a 1㎝(3/8″) seam allowance.
Open out, press pieces away from the zipper.
Attach the outer and lining to the other side of the zip the same way.
Open out, press pieces away from and top stitch on both 3㎝ (1¼″) away from the zipper.
Sew the side panels to the ends of the completed zipper panel to attach them.

Align the upper and lower center points of the zipper panel with the upper and lower center points of the body panel, and sew by aligning the side center points of the zipper panel with the side center points of the body panel.
The bias tape is placed and stitch up to the end.
Fold the bias twice, cover the seam allowance, and sew.
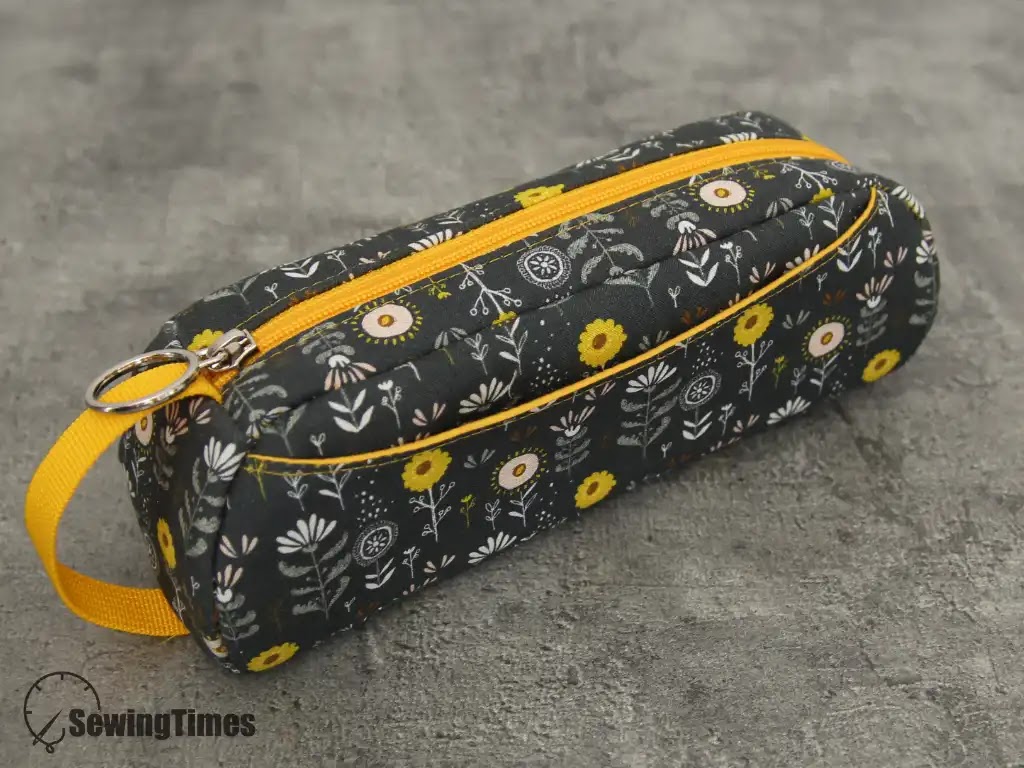
You are finished!!!
That’s it for today!
Take a look at other fun tutorials, too.


