Step-by-Step Guide: Making a 3D Square Pencil Case with Expandable Tray!

Imagine having a pencil case that unfolds into a convenient tray, effortlessly organizing your supplies.

In this step-by-step guide, I'll demonstrate how to craft a three-dimensional square pencil case from fabric.

The highlight? A zipper that, when opened, expands the case into a functional tray, revolutionizing your stationery storage.
So, grab your fabric and let's dive into this creative and functional project!

The finished measurements of this pouch are approximately
22㎝(8¾″) W × 7㎝(2¾″) H × 7㎝(2¾″) D.
CLICK HERE TO WATCH THE VIDEO TUTORIAL
You may watch the full video tutorial on my Youtube channel.
Share this video with a lot of people who need it.
Let's get started!!
◎ Main Panel
① 24㎝ × 29㎝ (9½″ × 11½″) Outer layer
① 24㎝ × 29㎝ (9½″ × 11½″) Lining
① 22㎝ × 27㎝ (8¾″ × 10¾″) Fusible fleece
◎ Side Panel
② 16㎝ × 15㎝ (6¼″ × 6″) Outer layer
② 14㎝ × 6.5㎝ (5⅝″ × 2⅝″) Fusible fleece
◎ Others
① 40㎝ (15⅞″) Zipper
① 5㎝ × 8㎝ (2″ × 3¼″) Zipper end Fabric
① Snap Buttons


Fold 1cm the right seam.
With assembled outer layer right side up, center zipper right side facing down along top and bottom edge.
Using your zipper foot, sew along top edge using a 0.7cm seam allowance.

Fold 1cm the right seam of the lining.
Place the lining, right side down on top. Pin in place.
Using your zipper foot, sew 3 sides using a 1cm seam allowance, leaving right side.

Open out, press pieces away from and top stitch on both 0.3cm away from the zipper.

Sew the center line of the main fabric and lines 7cm to the left and right from the center line.

Fold and iron the stitched lines.

Fold the side panel right sides together in half, and sew 3 sides with a seam allowance of 1cm, leaving an opening.
💃💃💃

Clip the corners and turn it right side out by pulling the fabric through the opening.
Press and stitch the top edge.
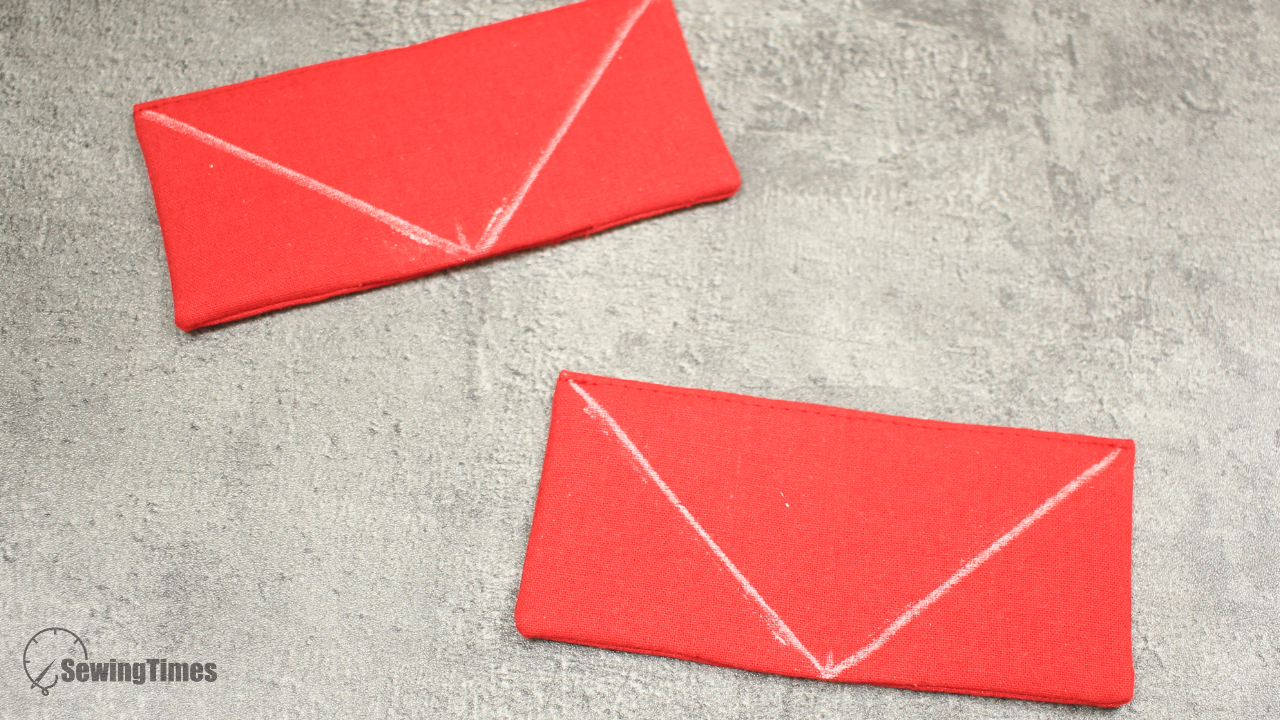
Sew by drawing diagonal lines from the center of the side panel to both sides.

Fold and iron the stitched lines.

Sew the side panels to the sides of the main panel.

Turn it inside out and sew both sides.

Attach the snap buttons.

You are finished!!!
(●'◡'●)
RELATED POSTS:
Craft Your Own Fabric Wallet: DIY Guide to a Sleek Half-Zip Card Holder


