DIY Diaper Backpack: The Perfect Blend of Style and Function
Master the art of creating a stylish diaper backpack that doesn't skimp on functionality.
Our latest post provides a detailed walkthrough on crafting a backpack with a unique wire frame opening.
Designed with busy parents in mind, it features pockets on every side for ultimate organization.
We'll guide you through the process, ensuring you end up with a backpack that's as chic as it is practical.
The finished measurements of this bag are approximately
25㎝(9⅞″) W × 30㎝(11⅞″) H × 15㎝(6″) D.
CLICK HERE TO WATCH THE VIDEO TUTORIAL
You may watch the full video tutorial on my Youtube channel.
Share this video with a lot of people who need it.
Let's get started!!
◎ Main Panel
② 27㎝ × 32㎝ (10¾″ × 12⅝″) Outer layer - Front and Back
② 17㎝ × 32㎝ (6¾″ × 12⅝″) Contrast Color Fabric - Sides
① 27㎝ × 17㎝ (10¾″ × 6¾″) Outer layer - Bottom
② 42㎝ × 39.5㎝ (16⅝″ × 15⅝″) Lining
② 25㎝ × 30㎝ (9⅞″ × 11⅞″) Fusible fleece
② 15㎝ × 30㎝ (6″ × 11⅞″) Fusible fleece
① 25㎝ × 15㎝ (9⅞″ × 6″) Fusible fleece
◎ Zipper Panel
② 42㎝ × 4.5㎝ (16⅝″ × 1¾″) Outer layer
② 42㎝ × 4.5㎝ (16⅝″ × 1¾″) Lining
② 40㎝ × 2.5㎝ (15⅞″ × 1″) Fusible fleece
② 6㎝ × 5㎝ (2⅜″ × 2″) Contrast Color Fabric
◎ Zipper Pocket
① 27㎝ × 8㎝ (10¾″ × 3¼″) Contrast Color Fabric
① 27㎝ × 4.5㎝ (10¾″ × 1¾″) Lining
① 27㎝ × 17㎝ (10¾″ × 6¾″) Contrast Color Fabric
① 27㎝ × 17㎝ (10¾″ × 6¾″) Lining
◎ Side Pocket
② 17㎝ × 32㎝ (6¾″ × 12⅝″) Outer layer
◎ Back Pocket
① 27㎝ × 37㎝ (10¾″ × 14⅝″) Contrast Color Fabric
◎ Handle
② 27㎝ × 8㎝ (10¾″ × 3¼″) Contrast Color Fabric
◎ Others
① 50㎝ (19¾″) Zipper
① 25㎝ (9⅞″) Zipper
② 8㎝ × 8㎝ (3¼″ × 3¼″) Outer layer
① 2.5㎝ (1″) Wide Webbing Strap 200㎝ (79″)
② 2.5㎝ (1″) Wide Rectangle Ring
② 2.5㎝ (1″) Wide Triglides Slide
① Pairs 25㎝ × 7㎝ (10″ × 2¾″) Internal Wire Frame
With assembled lining right side up, center zipper right side facing up along top edge.
Place the outer layer, right side down on top. Pin in place.
Using your zipper foot, sew along top edge using a 1㎝(3/8″) seam allowance.
Attach the outer and lining to the other side of the zip the same way.
Fold the top outer layer of the zipper pocket and align it with the edge of the lining.
Fold the top outer layer and lining of the zipper pocket inward by 1㎝(3/8″) and iron.
Place it on the front of the bag and sew.
Fold the side pocket wrong sides together in half, and sew the top.
Place the side pocket on the right side of the side panel and sew 3 sides.
Fold the back pocket wrong sides together in half, and sew the top.
Place the back pocket on the right side of the back panel and sew 3 sides.
Fold the handle pieces in half, wrong sides together to make a crease.
Then fold each edge in toward the middle and press.
Stitch along both long edges of the strip, 0.3cm from the edge.
Place and sew the handles on the right side of the front and back panel.
😍😍😍
Place the bag strap on the back of the bag as shown in the photo above and sew.
Sew the front and back panels to the bottom panel.
Sew the side panels to the bottom panel.
Sew along the side lines.
Place the right sides together of the linings and sew 3 sides.
Combine the seams so that a flat base is formed.
Sew 15㎝(6″) length.
Place the lining inside the outer layer and sew along the opening of the bag.
With assembled lining right side up, center zipper right side facing up along top edge.
Place the outer layer, right side down on top. Pin in place.
Sew except for 2㎝(3/4″) on both ends of the fabric.
Attach the outer and lining to the other side of the zip the same way.
Flip the layers so the outer layers are right sides together, and the lining pieces are right sides together.
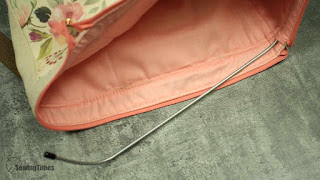
Then sew both sides. At this time, leave about 1.5㎝(5/8″) on one side of the lining so that the frame can fit.
Sew the outer layer of the zipper panel to the entrance of the bag.
Fold the lining of the zipper panel inward by 1㎝(3/8″).
Place it the lining seam allowance of the bag and sew.
Insert the wire frame into the hole on the lining of the zipper panel.
You are finished!!
(●'◡'●)
RELATED POSTS:


