Make your own water bottle holder

Learning how to make your own water bottle bag is not only a fun and creative activity, but it's also an important step towards reducing your plastic usage and living a more sustainable lifestyle.

By creating your own bag, you'll be able to express your own unique style and have a functional accessory that will last for years.

Plus, you'll be doing your part in reducing plastic waste and contributing to a healthier planet.

So, let's get crafting and make a positive impact on the world, one bag at a time.
Easy Bottle Bag Tutorial
#sewingtimes
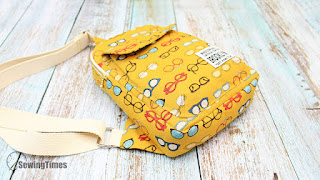
The finished measurements of this pouch are approximately
6.5㎝(2⅝″) W × 21㎝(8¼″) H × 6.5㎝(2⅝″) D.
👇👇👇
You may watch the full video tutorial on my Youtube channel.

Share this video with a lot of people who need it.
Let's get started!!💖
Main Fabric
1 15㎝ × 42.5㎝ (6″ ×16⅞″) Outer layer
1 15㎝ × 42.5㎝ (6″ × 16⅞″) Lining
1 13㎝ × 40.5㎝ (5⅛″ × 16⅛″) Fusible fleece
Drawstring Cover
1 28㎝ × 10㎝ (11⅛″ × 4″) Outer layer
D Ring Fabric
2 3㎝ × 5㎝ (1¼″ × 2″) Outer layer
1 1.5㎝(5/8″) wide Webbing Strap 25㎝(10″)
2 1.5㎝(5/8″) wide D ring
2 1.5㎝(5/8″) Swivel Snap
1 Cotton string 45㎝(17¾″)
1 Cord Lock


The pattern for making this can be drawn by yourself by watching my YouTube video.

Cut the interfacing into the shape of the pattern. And fuse the fusible fleece, centered, to the wrong side. Cut by adding 1cm from the edge of the interfacing.

Fold the main fabric right sides together in half, and sew both sides with a seam allowance of 1cm, leaving an opening on the lining.

Combine the seams so that a flat base is formed.
Sew with an allowance of about 1cm.

Fold the drawstring fabric right sides together in half, and sew side with a seam allowance of 1cm″, leaving 4cm on top.

Fold the fabric in twice and sew.

Fold your D ring fabric piece in half with the 5cm sides together and press.
Fold in half to make your tabs.
Place the taps on both sides of the main fabric and sew.

Place the right sides together of the main fabric and drawstring fabric and sew with an allowance of about 0.7cm.


Put the outer fabric inside the lining and align the opening. Sew with an allowance of about 1cm.

Turn out the bag through the hole that we left not stitched.
After this, sew up this hole.

Put the lining and top cover inside.
Topstitch all the way around of the top of the bag entrance.

Insert the string through one end of the casing, using a safety pin.
Tie the ends of the string in a knot and pull the ends to close the bag.

YOU ARE FINISHED!
You might like these bags and pouches
(●'◡'●)