Easy 2 Shoulder Bags Step-by-Step DIY Guide

Are you craving a stylish and functional bag that reflects your unique taste?

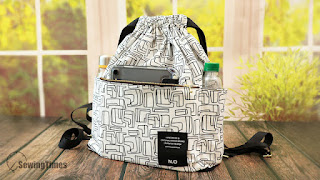
Look no further! Our comprehensive DIY guide will take you through the process of making a chic hobo bag from scratch.
Discover how to draw the pattern, cut the fabric, and master the art of sewing to create a lightweight shoulder bag that's perfect for everyday use.

Whether you're a sewing enthusiast or a beginner eager to explore your creative side, this tutorial will equip you with the skills to craft a fashionable accessory that's truly one-of-a-kind.
Let's dive in and bring your dream bag to life!

The finished measurements of this pouch are approximately
< Small Size >
28㎝(11⅛″) W × 24㎝(9½″) H × 8㎝(3¼″) D
< Large Size >
35㎝(13¾″) W × 30㎝(11⅞″) H × 10㎝(4″) D
CLICK HERE TO WATCH THE VIDEO TUTORIAL
You may watch the full video tutorial on my Youtube channel.
Share this video with a lot of people who need it.
Let's get started!!
Small Size
② 38㎝ × 53㎝ (15″ × 21″) Outer layer
② 38㎝ × 53㎝ (15″ × 21″) Lining
① 9㎝ × 4㎝ (3⅝″ × 1⅝″) Mid-weight woven fusible interfacing
① Magnetic Buttons


The pattern for making this can be drawn by yourself by watching my YouTube video.

The pattern includes seam allowances.

Cut the 2 outer and 2 lining into the shape of the pattern.

Place the right sides together of the outer and lining of the pocket fabric and sew the 4 sides with an allowance of about 1㎝, leaving an opening.

Clip the corners and turn it right side out by pulling the fabric through the opening.
Press and topstitch the top edge.

Place pockets on the outer and lining and sew on 3 sides.

Place the right sides together of the 2 outers and sew the both sides and bottom.
Place the right sides together of the 2 linings and sew the both sides and bottom, leaving an opening.

Combine the side seam and bottom seam so that a flat base is formed. Sew with an allowance of about 1㎝.

Turn the outer layer right side out.

Put the outer fabric into the lining.

Sew along the handle and the bag opening.
At this time, leave about 7cm of the ends of the handles on both sides without stitching.

Turn out the bag through the opening of the lining.
And sew up this hole.

Open the unsewn end of the handle.
Place the right sides together of the handle and sew.

Top stitch the edges of the bag from the opening to the handle.

The small size bag is complete!!!
Now, shall we make a large-sized bag?
Large Size
② 47㎝ × 72㎝ (18⅝″ × 28½″) Outer layer
② 47㎝ × 72㎝ (18⅝″ × 28½″) Lining
① 9㎝ × 4㎝ (3⅝″ × 1⅝″) Mid-weight woven fusible interfacing
① Magnetic Buttons


The pattern for making this can be drawn by yourself by watching my YouTube video.
The pattern includes seam allowances.

The Position of the pocket is the same as that of a small sized bag.
And the rest of the way to make it is the same.


The difference in size between the small and large bags is as shown in the picture above.