Create the Perfect Cube Bag for All Your Essentials
Discover how to create the perfect Cube Bag, ideal for storing all your essentials.
This cube pouch features a front zipper and an interior mesh pocket, making it easy to keep everything organized.
The bag also has a handle, making it convenient to carry around.
I’ve designed patterns for three different sizes, so you can make the bag that best suits your needs.
Follow this tutorial to craft a functional and stylish Cube Bag that’s perfect for any occasion.
The finished measurements of this pouch are approximately
12.5㎝(5″) W × 12.5㎝(5″) H × 12.5㎝(5″) D.
CLICK HERE TO WATCH THE VIDEO TUTORIAL
You may watch the full video tutorial on my Youtube channel.
Share this video with a lot of people who need it.
Let's get started!!
◆ Main Panel
② 14.5㎝ × 14.5㎝ (5¾″ × 5¾″) Outer layer
② 14.5㎝ × 14.5㎝ (5¾″ × 5¾″) Lining
② 12.5㎝ × 12.5㎝ (5″ × 5″) Fusible fleece
◆ Zipper Panel
① 40㎝ × 4.5㎝ (15⅞″ × 1¾″) Outer layer
① 40㎝ × 4.5㎝ (15⅞″ × 1¾″) Lining
① 38㎝ × 2.5㎝ (15″ × 1″) Fusible fleece
① 40㎝ × 11㎝ (15⅞″ × 4⅜″) Outer layer
① 40㎝ × 11㎝ (15⅞″ × 4⅜″) Lining
① 38㎝ × 9㎝ (15″ × 3⅝″) Fusible fleece
◆ Back Panel
① 10㎝ × 14.5㎝ (4″ × 5¾″) Outer layer
① 10㎝ × 14.5㎝ (4″ × 5¾″) Lining
① 8㎝ × 12.5㎝ (3¼″ × 5″) Fusible fleece
◆ Inside Pocket
② 14.5㎝ × 7㎝ (5¾″ × 2¾″) Mesh Fabric
◆ Handle
① 16㎝ × 8㎝ (6¼″ × 3¼″) Outer layer
◆ Others
① 40㎝(15⅞″) Zipper
① 12.5㎝ (5″) Zipper
① 4㎝ (1⅝″) Wide bias tape 140㎝(55⅜″)
② 3㎝ × 5㎝ (1¼″ × 2″) Zipper Tab
Place the wrong sides together of the outer and lining and sew all the edges.
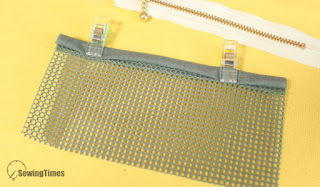
Place the bias tape on the right side of the mesh fabric and sew with an allowance of about 1㎝(3/8″).
Open out, press the bias tape and fold it inward twice.
Place mesh fabric above and below the zipper so that the 1㎝(3/8″) width of the zipper is visible.
Place the mesh pocket on the right side of the lining and sew.
Fold the handle pieces in half, wrong sides together to make a crease. Then fold each edge in toward the middle and press. Stitch along both long edges of the strip, 0.2cm(1/8'') from the edge.
Place the handle on the middle of the outer layer and sew both sides.
With assembled lining right side up, center zipper right side facing up along top edge. Place the outer layer, right side down on top. Pin in place. Using your zipper foot, sew along top edge using a 1㎝(3/8″) seam allowance.
Open out, press pieces away from the zipper.
Attach the outer and lining to the other side of the zip the same way.
Open out, press pieces away from and top stitch on both 0.2cm(1/8”) away from the zipper.
Layer an lining (back panel) piece face up, then the zipper panel face up along one edge, and then the outer (back panel) face down.
Sew the side with an allowance of about 1㎝(3/8″).
Place the opposite side of the outer layer of the back panel on the opposite side of the zipper panel and sew.
Open the lining of the back panel and fold 1㎝(3/8″) inward.
Sew to match the zipper panel.
Place the bias tape on the edge of the zipper panel and sew.
Mark the quarter points of the main panel and zipper panel.
Place the right sides together of the bottom and side at the quarter points and sew with an allowance of about 1㎝(3/8″).
Fold the bias twice, cover the seam allowance, and sew.
You are finished !!!


